среда, 24 мая 2017 г.

Pottery Barn Inspired Rolling Toy Box: A Perfect Beginning DIY Project


I wanted a custom built toy box for my toddler for Christmas this year. It needed to be light enough that he could move it around, it had to be on wheels, and I wanted it to be open, so he wouldn't pinch his fingers.. but I didn't want to spend a lot of money. I decided to build it myself, so I didn't want it to be too complicated.
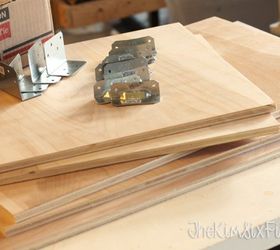
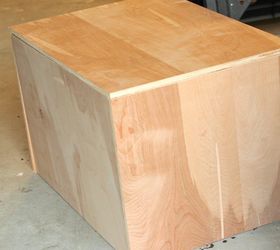
I was able to use thin 1/2-inch plywood, but I knew I couldn't use standard butt joints since the plywood would split. So I used some Simpson-Strong Tie metal angle brackets (http://diydoneright.com/products/), which made it easy to put the box together and keep it square, plus the joints were really strong.
I used chalk paint and L brackets to make it feel a little more 'masculine' and added a chalkboard paint label to the front.
The total cost was under $40. I have seen similar toy boxes at Pottery Barn retailing for $399 so I'm pretty thrilled with my version. Full details (including the parts list and step-by-step instructions can be found: http://bit.ly/1YoXCDy


The supplies included a sheet of plywood, a couple of 1x2s and some Strong Tie angle brackets which meant NO POCKET HOLES!! (who knew a "baby gift" could include galvanized angle brackets!?)


pottery barn inspired rolling toy box a perfect beginning diy project, chalk paint, diy, organizing, storage ideas, woodworking projects


I built the box and attached it to the bottom using L brackets, there are no exposed nail or screw heads on the outside of the box!


pottery barn inspired rolling toy box a perfect beginning diy project, chalk paint, diy, organizing, storage ideas, woodworking projects


Since the trim was only decorative, I used a few finishing nails to hold them on.


pottery barn inspired rolling toy box a perfect beginning diy project, chalk paint, diy, organizing, storage ideas, woodworking projects


Original article and pictures take http://www.hometalk.com/11955871/pottery-barn-inspired-rolling-toy-box-a-perfect-beginning-diy-project site


Комментариев нет:

Отправить комментарий